# Git 工程化之提交规范
# Git 提交信息规范
# 为什么需要提交信息规范
使用 Git 作为版本管理工具时,我们常用git commit命令来提交代码
git add .
git commit -m "A bug fix"
使用-m参数来指定提交信息,即 commit message
一般来说,commit message 应当清晰明了,说明本次提交的目的。好的 commit message 可以帮助快速查找梳理代码,辅助生成文档等
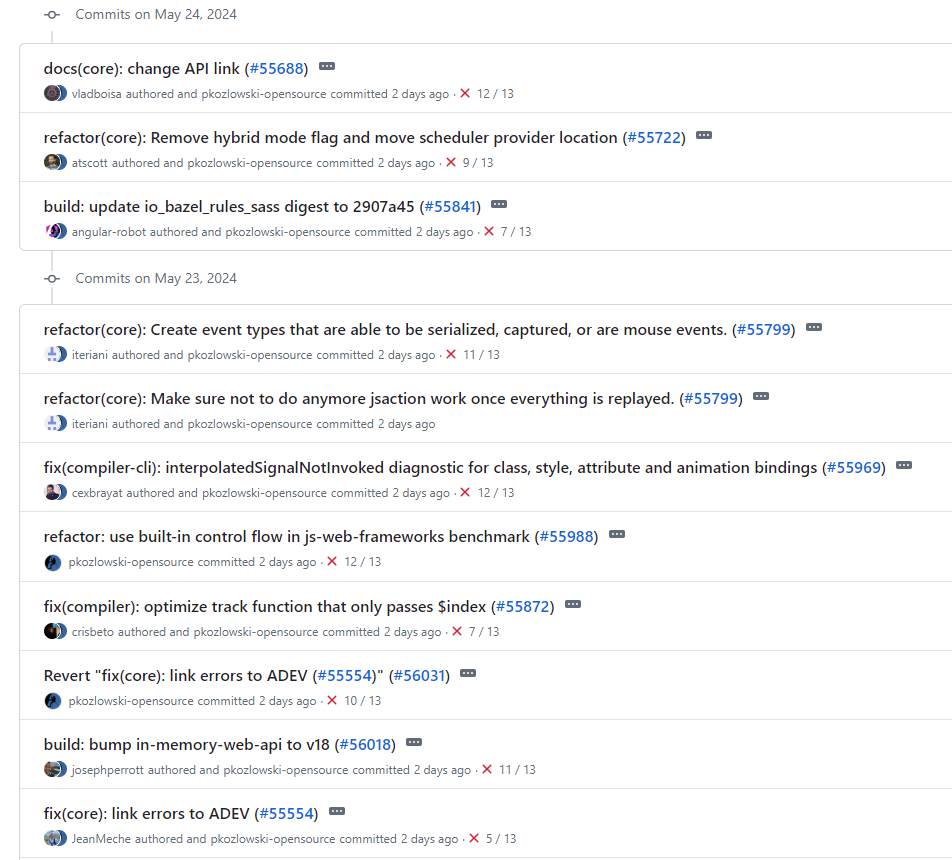
在 GitHub 社区中,commit message 有多种规范,其中 Angular 团队所使用的规范,称为 Angular 规范,目前使用比较普遍,并且有配套工具
# Angular Commit Message 规范
# commit message 格式
<type>(<scope>): <subject>
// 空一行
<body>
// 空一行
<footer>
# 第一行
只有一行,包括三个字段,type(必需)、scope(可选)和subject(必需)
type用于说明 commit 的类别,只允许使用下面7个标识。
feat       新功能
fix        修复 bug
docs       文档
style      调整代码格式
refactor   重构(非新增功能,也非 bug 修复的代码变动)
perf       代码优化
test       增加测试
build      打包相关、外部依赖变动
ci	       持续集成、自动构建相关变动
chore      其他改动(非 src,也非 test 的改动)
revert     代码回退
scope用于说明 commit 影响的范围,比如数据层、控制层、视图层等等,视项目不同而不同。
subject是 commit 目的的简短描述,不超过50个字符,以动词开头,使用第一人称现在时,比如add xxx
不管是哪一个部分,任何一行都不推荐超过 72 个字符,避免自动换行影响显示效果
# Body 部分
对本次 commit 的详细描述,可以分成多行
# Footer 部分
一般用于两种情况,破环性变动和关闭 issue
如果当前提交导致与之前版本不兼容,则 Footer 部分以BREAKING CHANGE开头,后面是对变动的描述、以及变动理由和迁移方法
BREAKING CHANGE: isolate scope bindings definition has changed.

    To migrate the code follow the example below:

    Before:

    scope: {
      myAttr: 'attribute',
    }

    After:

    scope: {
      myAttr: '@',
    }

    The removed `inject` wasn't generaly useful for directives so there should be no code using it.
如果当前 提交针对某个 issue,可以在 Footer 部分关闭这个 issue
Closes #234
# Git Hooks
# Git Hooks 简介
Git 提供了多种不同类型的钩子(hooks),可以在特定的操作时执行自定义的脚本或命令
pre-commit:在创建提交前运行,通常用于代码格式化、静态代码分析或运行单元测试等任务
prepare-commit-msg:在提交消息被编辑后但提交之前执行,通常用于验证或修改提交消息
commit-msg:在提交消息被编辑后但提交之前执行,用于强制执行提交消息格式规则
post-commit:在提交完成后执行,用于执行与提交相关的任务
pre-rebase:在进行 rebase 操作前执行,通常用于准备 rebase 过程
post-rewrite:在执行诸如 git commit --amend 或 git rebase 等操作后执行,用于与重写历史相关的任务
pre-push:在推送操作前执行,用于在推送更改之前运行测试或代码检查等任务
pre-receive:在远程仓库接收到推送操作时执行,通常用于验证或预处理
update:在服务器上接收推送操作并更新引用时执行,用于额外的验证或处理
post-receive:在接收到推送操作并完成更新后执行,用于执行后续任务
借助pre-commit或者commit-msg可以方便的对 Git 提交信息进行校验
Git Hooks 脚本文件一般放在.git/hooks目录下,文件名为特定的钩子名称,如commit-msg
在 Git 2.9 版本,引入了core.hooksPath的配置,可以自定义 hooks 脚本所在目录
git config core.hooksPath "<path-to-git-hooks>"
# commit-msg 脚本
#!/bin/bash
# 获取提交信息
commit_msg_file=$(git rev-parse --git-dir)/COMMIT_EDITMSG
commit_msg=$(head -n 1 ${commit_msg_file})
# 使用正则匹配 Angular 提交日志格式
regex="^(feat|fix|docs|style|refactor|perf|test|build|ci|chore|revert|wip|workflow|release)(\(.+\))?: .{1,72}$"

if [[ ! ${commit_msg} =~ ${regex} ]]; then
  echo "Error: Commit message format does not comply with Angular commit message convention"
  echo "The correct format is: type(scope): short description (not exceeding 72 characters)"
  echo "For example: feat(core): Add new feature"
  exit 1
fi

exit 0
# Java 使用 Git Hooks
在 Java 项目中,可以使用 Git Hooks 脚本来校验 commit message,但是.git目录下的文件是不共享的,如果将脚本维护在项目结构目录中,需要手动复制或配置来使其生效,这就需要通过项目构建工具自动来完成
我们可以使用 maven 插件执行命令或者拷贝文件的功能来实现这一点,也可以使用专门的 Git Hooks 相关的插件
# maven Git Hooks 插件
git-build-hook (opens new window)
<plugin>
    <groupId>com.rudikershaw.gitbuildhook</groupId>
    <artifactId>git-build-hook-maven-plugin</artifactId>
    <version>3.5.0</version>
    <configuration>
        <gitConfig>
            <core.hooksPath>ci/git-hooks</core.hooksPath>
        </gitConfig>
    </configuration>
    <executions>
        <execution>
            <goals>
                <goal>configure</goal>
            </goals>
        </execution>
    </executions>
</plugin>
Git Hooks 相关文件放在ci/git-hooks目录下,在 maven 执行编译时,会自动配置到 hooksPath
当不按规范提交时提示
> git commit -m "test msg"
Error: Commit message format does not comply with Angular commit message convention
The correct format is: type(scope): short description (not exceeding 72 characters)
For example: feat(core): Add new feature
# 前端 Git 工程化
得益于丰富 NodeJs 的生态,前端在 Git 工程化、规范化方面有很多优秀的工具可供使用
# commitlint
commitlint 是用来校验 commit message 是否符合规范的工具
安装 commitlint
npm install @commitlint/cli @commitlint/config-conventional -D
配置 commitlint
//// commitlint.config.js
module.exports = {
  ignores: [commit => commit.includes('init')],
  extends: ['@commitlint/config-conventional'],
  rules: {
    'body-leading-blank': [2, 'always'],
    'footer-leading-blank': [1, 'always'],
    'header-max-length': [2, 'always', 108],
    'subject-empty': [2, 'never'],
    'type-empty': [2, 'never'],
    'type-enum': [
      2,
      'always',
      [
        'feat',
        'fix',
        'perf',
        'style',
        'docs',
        'test',
        'refactor',
        'build',
        'ci',
        'chore',
        'revert',
        'wip',
        'workflow',
        'types',
        'release'
      ]
    ]
  }
};
测试校验功能
> echo "aaa" | npx commitlint
⧗   input: aaa
✖   subject may not be empty [subject-empty]
✖   type may not be empty [type-empty]

✖   found 2 problems, 0 warnings
ⓘ   Get help: https://github.com/conventional-changelog/commitlint/#what-is-commitlint
# husky
husky 是 NodeJs 中帮助配置 Git Hooks 的工具,通过配置 husky 实现提交前的代码检查、commit message 校验
安装 husky
npm install husky -D
创建 husky 脚本文件
在.husky目录下,创建 pre-commit、commit-msg 脚本文件
### .husky/common.sh
#!/bin/sh
command_exists () {
  command -v "$1" >/dev/null 2>&1
}
# Workaround for Windows 10, Git Bash and Pnpm
if command_exists winpty && test -t 1; then
  exec < /dev/tty
fi

### .husky/pre-commit
#!/bin/sh
. "$(dirname "$0")/_/husky.sh"
. "$(dirname "$0")/common.sh"
[ -n "$CI" ] && exit 0
PATH="/usr/local/bin:$PATH"
# 执行 eslint fix
npm run lint:fix

### .husky/commit-msg
#!/bin/sh
# shellcheck source=./_/husky.sh
. "$(dirname "$0")/_/husky.sh"
PATH="/usr/local/bin:$PATH"
# 执行 commitlint 校验
npx --no-install commitlint --edit "$1"
配置 husky npm script
//// package.json
"scripts": {
    "prepare": "husky"
}
prepare 在执行npm install之前会自动调用,也可直接执行npm run prepare配置 husky hooks
# lint-staged
在上面的 husky 脚本文件 pre-commit 中调用了 eslint 相关命令进行代码格式检查和格式化,这往往是针对全体文件的,而 lint-staged 就是用来帮助设定只检查 Git 暂存区文件的工具
lint-staged 允许指定不同类型后缀文件执行不同指令的操作,如 eslint 或 stylelint
安装 lint-staged
npm install lint-staged -D
配置 lint-staged
//// .lintstagedrc
{
  "*.{js,jsx,ts,tsx}": [
    "prettier --cache --ignore-unknown  --write",
    "eslint --cache --fix"
  ],
  "{!(package)*.json,*.code-snippets,.!({browserslist,npm,nvm})*rc}": [
    "prettier --cache --write--parser json"
  ],
  "package.json": ["prettier --cache --write"],
  "*.vue": [
    "prettier --write",
    "eslint --cache --fix",
    "stylelint --fix --allow-empty-input"
  ],
  "*.{css,scss,html}": [
    "prettier --cache --ignore-unknown --write",
    "stylelint --fix --allow-empty-input"
  ],
  "*.md": ["prettier --cache --ignore-unknown --write"]
}
使用 lint-staged
npx lin-staged
# Git 命令行工具
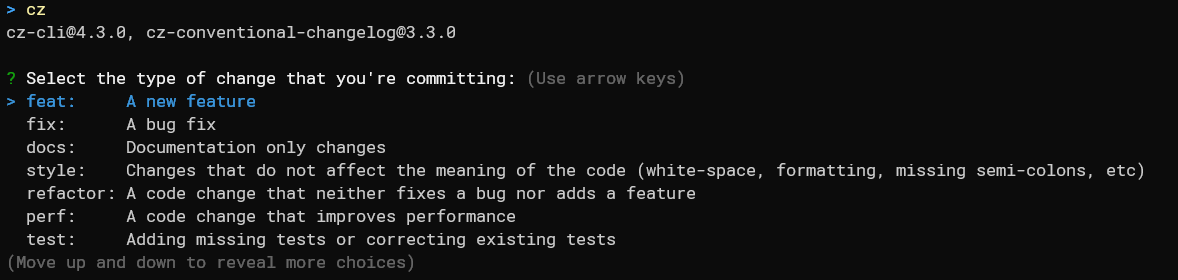
# commitizen
commitizen 是用来代替git commit的工具,提供交互式命令行帮助填写 commit message
安装 commitizen 和 cz-conventional-changelog 提交规范
npm install commitizen cz-conventional-changelog -g
配置 commitizen
### ~/.csrc(全局安装时配置 )
{ "path": "cz-conventional-changelog" }

### package.json(项目中安装时配置 )
"config": {
	"commitizen": {
  		"path": "./node_modules/cz-conventional-changelog"
	}
}
使用 commitzen,可以使用cz、git-cz、commitzen命令
# changelog
changelog 指 conventional-changelog-cli,是帮助从 Git 提交日志生成变更日志的工具
安装 conventional-changelog-cli
npm install conventional-changelog-cli -g
使用conventional-changelog命令
# 使用 angular 规范,在文件头部追加 changelog
conventional-changelog -p angular -i CHANGELOG.md -s
# 从头生成、覆盖旧的 changelog 文件
conventional-changelog -p angular -i CHANGELOG.md -s -r 0